Difference between revisions of "GX10/K10D Repair"
(→Finding The Reason) |
|||
| Line 7: | Line 7: | ||
= Finding The Reason = | = Finding The Reason = | ||
| − | I removed the bottom of the camera´s housing first, then the rest of it. Of course I touched the supply voltage for the flash which can be quite painful. '''Discarge the flash before proceeding!''' A good spot for discarging is a solder pad near the view finder (see picture). I used a 1k resistor against the chasis ground. | + | I removed the bottom of the camera´s housing first, then the rest of it. ''Of course'' I touched the supply voltage for the flash which can be quite painful. '''Discarge the flash before proceeding!''' A good spot for discarging is a solder pad near the view finder (see picture). I used a 1k resistor against the chasis ground. |
| − | |||
| − | |||
| + | I pushed the release button several times and noticed that the lower right corner of the main PCB was getting very hot. What´s wrong there? | ||
The heat came from a motor driver IC which seem to control the GX10´s two motors. | The heat came from a motor driver IC which seem to control the GX10´s two motors. | ||
| + | <gallery> | ||
| + | File:Gx10 flash supply.jpg|Flash supply voltage | ||
| + | File:Gx10 motordriver.jpg|Location of the motor driver IC | ||
| + | </gallery> | ||
| + | Unsoldering the two motor wires and testing with a meter showed that '''the motor got a short circuit'''. The wires seem to be ok so it really might be a broken motor. Luckily the motor driver IC survived. Without motor the IC is not heating up as expected. Anyway, a DSLR without working mirror and shutter is less fun. | ||
| − | + | = The Motor = | |
| + | The defect motor drives the mirror and the shutter. It´s connected to the main PCB by two wires (red, black) in the lower right corner. It rotates only in one direction and is attached to a tricky set of gears and mechanics. Since the motor sits between the battery compartment and the shutter block, further or total disassembly will be needed. | ||
| + | |||
| + | = Disassembly = | ||
| + | Dissassembling such a device with the goal of a successful reassembly takes a lot of time, a detailed knowledge of the construction and endless patience. Check if you´ve got all of them before proceeding :) | ||
| + | In my case, time and patience was available, general knowledge of digital cameras not. The search for a service manual ended on [http://ricehigh.blogspot.com/ RiceHigh's Pentax Blog]. Thanks to the author, there is a [http://ricehigh.blogspot.com/2011/02/diy-reminder-pentax-service-manuals.html page] encouraging us to do repair attempts, including links to the wanted service manuals. Great so we´re ready to go! | ||
Revision as of 13:04, 13 October 2011
I currently got a non working Samsung GX10 digital camera (DSLR). It turned out, that the GX10 is almost the same camera as the Pentax K10D. This promised a huge variety of how to´s and documents. Unfortunately I could not find that much information online.
The Defect
The camera refuses to take any pictures. When pressing the shutter release button, a rumbling noise can be heard and felt. It´s prduced by the moving SR block which carries the CCD sensor and reduces shocks while exposure. This noise is normal but hard to hear in a functional camera, because the mirror/shutter is much louder. Not in this faulty camera: The mirror is not moving a bit when pressing the release button. No mirror or shutter movement, also no noises from a blocked motor or electric magnet. The camera does not show any error messages. Everything works as normal but taking a picture is impossible.
OK, let´s take a look inside ...
Finding The Reason
I removed the bottom of the camera´s housing first, then the rest of it. Of course I touched the supply voltage for the flash which can be quite painful. Discarge the flash before proceeding! A good spot for discarging is a solder pad near the view finder (see picture). I used a 1k resistor against the chasis ground.
I pushed the release button several times and noticed that the lower right corner of the main PCB was getting very hot. What´s wrong there? The heat came from a motor driver IC which seem to control the GX10´s two motors.
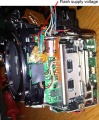
Flash supply voltage
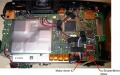
Location of the motor driver IC


Unsoldering the two motor wires and testing with a meter showed that the motor got a short circuit. The wires seem to be ok so it really might be a broken motor. Luckily the motor driver IC survived. Without motor the IC is not heating up as expected. Anyway, a DSLR without working mirror and shutter is less fun.
The Motor
The defect motor drives the mirror and the shutter. It´s connected to the main PCB by two wires (red, black) in the lower right corner. It rotates only in one direction and is attached to a tricky set of gears and mechanics. Since the motor sits between the battery compartment and the shutter block, further or total disassembly will be needed.
Disassembly
Dissassembling such a device with the goal of a successful reassembly takes a lot of time, a detailed knowledge of the construction and endless patience. Check if you´ve got all of them before proceeding :) In my case, time and patience was available, general knowledge of digital cameras not. The search for a service manual ended on RiceHigh's Pentax Blog. Thanks to the author, there is a page encouraging us to do repair attempts, including links to the wanted service manuals. Great so we´re ready to go!