GX10/K10D Repair
I currently got a non working Samsung GX10 digital camera (DSLR). It turned out, that the GX10 is almost the same camera as the Pentax K10D. This promised a huge variety of how to´s and documents. Unfortunately I could not find that much information online. There are also nearly no pictures of the inside or reports of successful repairs.
The following describes what I did in order to get the camera working again. I´m not an expert on this. Follow or don´t follow these instructions on your own risk. Think about what you´re doing before removing any screws and take full responsibility for it.
Contents
The Defect
The camera refuses to take any pictures. When pressing the shutter release button, a rumbling noise can be heard and felt. It´s prduced by the moving SR block which carries the CCD sensor and reduces shocks while exposure. This noise is normal but hard to hear in a functional camera, because the mirror/shutter is much louder. Not in this faulty camera: The mirror is not moving a bit when pressing the release button. No mirror or shutter movement, also no noises from a blocked motor or electric magnet. The camera does not show any error messages. Everything works as normal but taking a picture is impossible.
OK, let´s take a look inside ...
Finding The Reason
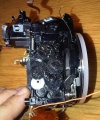
I removed the bottom of the camera´s housing first, then the rest of it. Of course I touched the supply voltage for the flash which can be quite painful. Discarge the flash before proceeding! A good spot for discarging is a solder pad near the view finder (see picture). I used a 1k resistor against the chasis ground.
I pushed the release button several times and noticed that the lower right corner of the main PCB was getting very hot. What´s wrong there? The heat came from a motor driver IC which seem to control the GX10´s two motors.
Unsoldering the two motor wires and testing with a meter showed that the motor got a short circuit. The wires seem to be ok so it really might be a broken motor. Luckily the motor driver IC survived. Without motor the IC is not heating up as expected. Anyway, a DSLR without working mirror and shutter is less fun.
The Motor
The defect motor drives the mirror and the shutter. It´s connected to the main PCB by two wires (red, black) in the lower right corner. It rotates only in one direction and is attached to a tricky set of gears and mechanics. Since the motor sits between the battery compartment and the shutter block, further or total disassembly will be necessary.
Disassembly
Dissassembling such a device with the goal of a successful reassembly takes a lot of time, a detailed knowledge of the construction and endless patience. Check if you´ve got all of them before proceeding :)
In my case, time and patience was available, general knowledge of digital cameras not. The search for a service manual ended on RiceHigh's Pentax Blog. Thanks to the author, there is a page encouraging us to do repair attempts, including links to the wanted service manuals. Great - so we´re ready to go!
Note that in order to unmount the motor, nearly the whole camera has to be disassembled. The CCD sensor must be removed, all flex PCBs and most of the wires have to be unsoldered and the shutter unit mechanics might fall apart. The distance to the sensor will be disadjusted and has to be adjusted according to the service manual. I haven´t found a good way to do this yet, mainly because lack of tools.
Some wire colors are hard to see in the manual. I took my own photos to have a clear plan when reassembling.
Tools
Basically not much was needed:
- a small philips screwdriver
- tiny nippers
- fine soldering iron
- multimeter
- power supply (1-5V, 1A)
Carefully follow the disassembly instructions in the manual until the battery compartment has gone. Then remove the shutter plate. The shutter will "snap" when removed. Don´t panic, it can be reattached in the right position later.
I used a lot of small boxes to store the removed parts together with their screws and labeled them with the part numbers in the manual. That makes reassembly easier.
Now the cover of the "gearbox" with the motor on it can be removed. Unscrew the 4 screws and lift the cover very carefully. There are three springs inside, two of them tend to jump out. However they can be put back in place following the instructions in the service manual.
It´s now easy to replace the motor.
Motor Repalce or Repair?
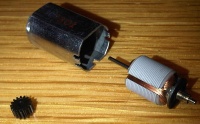
The motor could be replaced but there was no matching motor around here. So I decided to give it a try and opened the motor. The brushes were in a bad condition, the collector dusty. After bending the brushes, removing broken parts and cleaning the motor, it started spinning again.
It is not sure how effective this repair method for the motor is. Maybe the better choice is to get a new motor. I kept the old one.
Also I did some test runs by supplying the motor with about 3V. The mirror moves up and down, the shutter moves too but does not open. That´s normal because it is controlled by electro magnets which were not powered of course.
Reassembly
Reassembly was easier than expected. It took me about 3 hours to the final, complete camera.
Carefully follow the instructions for reassembling the mirror- and shutter gears. Note their position. There is no way to really try out the mechanism until most of the camera is reassembled. Be sure that everything runs smooth and easy. Just work the service manual backward.
I did not encounter serious problems while reassembling. The soldering is annoying and takes a lot of time. Everything is well described in the manual.
Long term experiences
After using the repaired camera for about one month, taking about 200 shots, the result is:
- The old, repaired motor still works well. Anyway, I found a brand new one in an on-line auction for about 26€. Just to have a spare part.
- Pictures taken with a high aperture are a bit out of focus which is because of the de-adjusted distance of the CCD. I´ll have to find a solution for this as mentioned in Disassembly above.
More Service Manuals
This thread (russian) includes various servicemanuals (in english), also the original Samsung one for the GX10 camera. It also links here ;)
Your comments are welcome!
<comments>


